> For the complete documentation index, see [llms.txt](https://help.supplyd.co/llms.txt). Markdown versions of documentation pages are available by appending `.md` to page URLs; this page is available as [Markdown](https://help.supplyd.co/supplyd-erp/settings/purchase-settings.md).
# Purchase Settings
Purchase Settings help you control how purchases are managed, giving you flexibility to set up ordering, approvals, pricing, suppliers, & other purchase-related processes to suit your business.
**Purchase Settings** help you set up and manage how purchasing works in Supply'd. From supplier and ordering options to pricing, approvals, and other purchase-related settings, you can configure these options to suit the way your business manages purchases.
In **Purchase Settings** you can set defaults for:
* [#cart-settings](#cart-settings "mention")
* [#smart-purchase-order](#smart-purchase-order "mention")
* [#receiving-orders](#receiving-orders "mention")
As an **Additional Option**, you can also adjust the numbering sequence used for different document types, such as purchase orders, sales orders, invoices, and more:
* [#edit-order-numbers](#edit-order-numbers "mention")
***
## Applying & Editing Your Purchase Settings
{% stepper %}
{% step %}
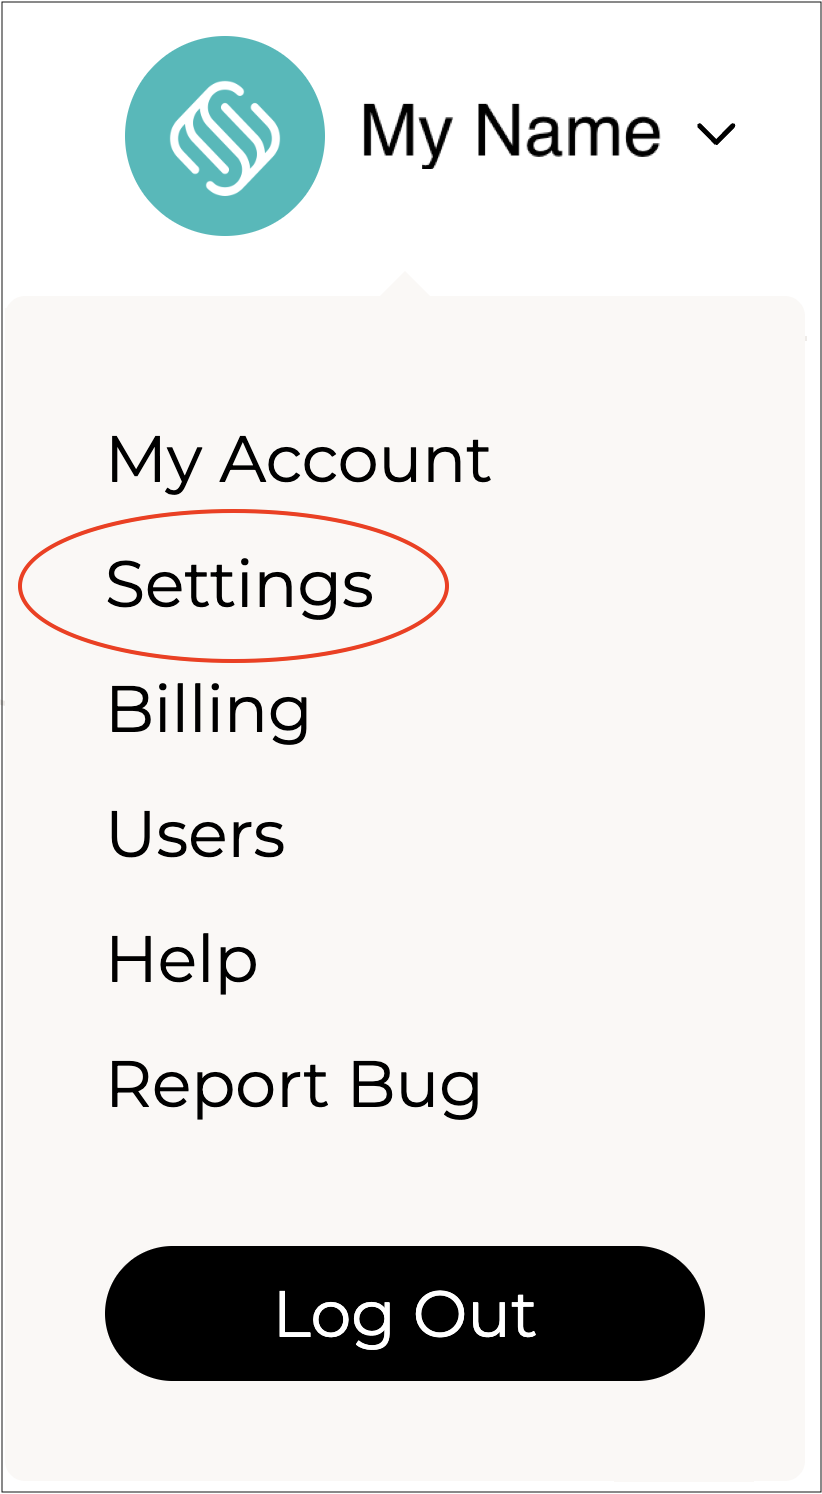
#### Go to Settings
Click on your company name in the top right and select **Settings**.
***
{% endstep %}
{% step %}
#### Select Purchase Settings
Scroll down and select **Purchase Settings** from the **Settings** menu.

The **Purchase Settings** form will open.
{% hint style="success" %}
To open or close the sections on this form click the little arrows to the right of the titles (as circled in red above).
{% endhint %}
\
Complete the fields as per the guidelines below:
***
{% endstep %}
{% step %}
### Cart Settings
Choose your settings for your cart and how you would like it to behave.
**Cart Mode**
Select the mode to use for the cart when checking out.
* **Standard:** Useful for most businesses looking to order from multiple suppliers at once.
* **Supplier:** A list of suppliers is shown without products and pricing for efficient loading when dealing with a large amount of suppliers. Each supplier order can be viewed and ordered individually.
**Universal Cart**
Choose whether or not to enable Universal Cart, allowing all users to share a single cart.
* **Yes:** Items added to cart by any user will appear for all users.
* **No:** Each user will have their own isolated cart.
**Cart Supplier Order**
Select the sort order to use for suppliers on the cart.
* **First to Last:** Suppliers with items added to the cart first will show at the top.
* **Last to First:** Suppliers with items added to the cart last will show at the top.
**Order By Department**
Choose how to handle department tracking in your Purchase Orders.
* **Yes:** Each department places a separate order to each supplier.
* **No:** Orders for the same supplier are merged together with no department tracking.
{% hint style="info" %}
To order by departments, they must first be set up in your Location settings.
👉 See the [Locations](/supplyd-erp/settings/locations.md#departments) section in the [Locations](/supplyd-erp/settings/locations.md) document.
{% endhint %}
**Enable Delivery Date**
Select whether or not to show a **Delivery Date** field on Purchase Orders.
**Order Date Display**
Choose which date - **Order Date** or **Delivery Date** - you would like to display on the purchase orders screen.
**Enable Send Later Option**
Choose whether to show a "**Send Now**" or "**Send Later**" option on Purchase Orders to delay when supplier's are notified.
{% hint style="success" %}
The **Enable Send Later** option is especially useful when you want to create all your purchase orders on one day but have suppliers receive them on specific days. This helps you control delivery timing -for example, avoiding all deliveries arriving on the same day.
{% endhint %}
**Send Change Confirmation Emails**
Whether or not to send an email confirmation to yourself, rather than the supplier, when a Purchase Order is modified.
***
{% endstep %}
{% step %}
### **Smart Purchase Order**
**Smart Purchase Order** settings allow you to configure default options that will automatically apply whenever you create a **Smart Purchase**, so you don’t need to manually adjust the same settings each time.
**Default Suppliers**
Select the suppliers you would like to include in your**Smart Orders**. Clicking on the field will display a list of your suppliers for you to choose from. Click the **X** beside a name to remove them.
**Default Location**
Choose the location you would like to place orders for.
**Default Method**
Select the method you would like to use for**Smart Orders**:
* **Suggested**: Uses smart recommendations based on forecasted sales, minimum stock hold, stock on order, and current stock levels to help keep you consistently in stock.
* **Minimum Stock Hold**: Orders only enough to reach the minimum stock level. This method ignores forecasted sales and instead considers current stock and stock on order, topping up to the minimum stock hold set for each product.
* **Refill Sold**: Reorders the quantity sold since the last order from this supplier was received.
**Warehouse Refill**
When stock is available at a designated refill warehouse, you can choose what action the system should take for that stock:
* **Create Transfer**: Automatically creates a transfer order for the required stock.
* **Don’t Transfer**: Treats the stock as available to avoid over-ordering, but does not generate a transfer order.
* **Ignore**: Completely ignores any stock available at refill locations when calculating availability.
**Ignore Untracked**
Select whether or not to ignore inventory that is untracked at this location.
***
{% endstep %}
{% step %}
### Receiving Orders
Choose your settings for receiving orders.
**Auto Next**
Select whether, when receiving an order, the system should automatically move to the next item if the exact quantity is received.
* **All Items:** Once the exact quantity of items has been received, it will jump to the next item to be received for all items.
* **Items More Than 1 Qty:** Once the exact quantity of items has been received it will jump to the next item to be received for any items with a quantity greater than 1.
* **Never:** The next item will never be automatically jumped to. You will need to manually select or scan each item.
**Allow Receive All**
Choose whether or not to show the **Receive All** option when receiving an order.
**Receive All** allows you to receive all items on an order without scanning or selecting each individual item.
**Enable QC Check**
Choose whether or not to show the quality control check when creating batches while receiving. Result will be stored against the batch.
**Enable Temperature Check**
Choose whether or not to display the temperature check for refrigerated or frozen products when creating batches during receiving. The result will be recorded against the batch.
**Auto Receive Transfers**
Choose whether or not to auto-receive transfers within the same location.
This is ideal for single-user transfers (eg. stock from back-of-house to storefront) where you want the stock to auto-receive once picked.
Transfers from other locations will still need to be received manually.
**Price-Embedded Barcode Price**
Select which price should be used by default to convert price-embedded barcodes into a weight for inventory.
***
{% endstep %}
{% step %}
#### Click Save
Click to apply your settings.
{% endstep %}
{% endstepper %}
***
## Additional Options
### Edit Order Numbers
Clicking on the 3 dots in the top right of the **Purchase Settings** form gives you the option to edit your order numbers.
Selecting **Edit Order Numbers** will open the **Order Numbers** form.
Here you can change the next number that will be allocated within different sections of the system, such as Sales Orders, Invoices, or Purchase Orders.
Click to apply your changes.
---
# Agent Instructions
This documentation is published with GitBook. GitBook is the documentation platform designed so that both humans and AI agents can read, navigate, and reason over technical content effectively. Learn more at gitbook.com.
## Querying This Documentation
If you need additional information that is not directly available in this page, you can query the documentation dynamically by asking a question.
Perform an HTTP GET request on the current page URL with the `ask` query parameter, and the optional `goal` query parameter:
```
GET https://help.supplyd.co/supplyd-erp/settings/purchase-settings.md?ask=&goal=
```
`ask` is the immediate question: it should be specific, self-contained, and written in natural language.
`goal` is optional and describes the broader end goal you are ultimately trying to accomplish on behalf of the user. GitBook uses it to tailor the answer towards what is most useful for that goal.
The response will contain a direct answer to the question and relevant excerpts and sources from the documentation.
Use this mechanism when the answer is not explicitly present in the current page, you need clarification or additional context, or you want to retrieve related documentation sections.

 [#smart-purchase-order](#smart-purchase-order "mention")
* [#receiving-orders](#receiving-orders "mention")
As an **Additional Option**, you can also adjust the numbering sequence used for different document types, such as purchase orders, sales orders, invoices, and more:
* [#edit-order-numbers](#edit-order-numbers "mention")
***
## Applying & Editing Your Purchase Settings
{% stepper %}
{% step %}
#### Go to Settings
Click on your company name in the top right and select **Settings**.
[#smart-purchase-order](#smart-purchase-order "mention")
* [#receiving-orders](#receiving-orders "mention")
As an **Additional Option**, you can also adjust the numbering sequence used for different document types, such as purchase orders, sales orders, invoices, and more:
* [#edit-order-numbers](#edit-order-numbers "mention")
***
## Applying & Editing Your Purchase Settings
{% stepper %}
{% step %}
#### Go to Settings
Click on your company name in the top right and select **Settings**.


 settings.


 to apply your changes.
---
# Agent Instructions
This documentation is published with GitBook. GitBook is the documentation platform designed so that both humans and AI agents can read, navigate, and reason over technical content effectively. Learn more at gitbook.com.
## Querying This Documentation
If you need additional information that is not directly available in this page, you can query the documentation dynamically by asking a question.
Perform an HTTP GET request on the current page URL with the `ask` query parameter, and the optional `goal` query parameter:
```
GET https://help.supplyd.co/supplyd-erp/settings/purchase-settings.md?ask=
to apply your changes.
---
# Agent Instructions
This documentation is published with GitBook. GitBook is the documentation platform designed so that both humans and AI agents can read, navigate, and reason over technical content effectively. Learn more at gitbook.com.
## Querying This Documentation
If you need additional information that is not directly available in this page, you can query the documentation dynamically by asking a question.
Perform an HTTP GET request on the current page URL with the `ask` query parameter, and the optional `goal` query parameter:
```
GET https://help.supplyd.co/supplyd-erp/settings/purchase-settings.md?ask=