> For the complete documentation index, see [llms.txt](https://help.supplyd.co/llms.txt). Markdown versions of documentation pages are available by appending `.md` to page URLs; this page is available as [Markdown](https://help.supplyd.co/supplyd-erp/settings/product-settings.md).
# Product Settings
In **Product Settings** in Supply’d, you can customise how your products are displayed and managed to suit your business needs. This includes setting up custom product tags for easy organisation, defining target profit margins to help with pricing accuracy, and choosing your preferred barcode format for consistent labelling. You can also personalise label colours, fonts, and ticket layouts to match your branding, and configure ticket information to ensure key details appear clearly on printed labels and product tags.
This document will guide you through applying settings for:
* [#product-editing](#product-editing "mention")
* [#predict-and-scan](#predict-and-scan "mention")
* [#product-pricing](#product-pricing "mention")
* [#product-defaults](#product-defaults "mention")
* [#sku-and-barcode-generation](#sku-and-barcode-generation "mention")
* [#product-labels](#product-labels "mention")
* [#product-tickets](#product-tickets "mention")
* [#gift-note-settings](#gift-note-settings "mention")
* [#nutritional-info](#nutritional-info "mention")
* [#custom-fields](#custom-fields "mention")
***
## Applying & Editing Product Settings
{% stepper %}
{% step %}
#### Go to Settings
Click on your company name in the top right and select **Settings**.
***
{% endstep %}
{% step %}
#### Select Product Settings
Select **Product Settings** from the **Settings** menu.

The **Product Settings** form will open.
{% hint style="success" %}
To open or close the sections on this form click the little arrows to the right of the titles (as circled in red above).
{% endhint %}
Complete the sections as per the guidelines below:
***
{% endstep %}
{% step %}
### Product Editing
**Show Matching Supply'd Suppliers**
Choose whether or not Supply'd suppliers should appear on product pages for products you have created. Barcodes are used to match the products.
**Hide Food Fields**
Choose whether or not to show food fields such as ingredients when editing a product.
**Custom Product Tags**
Add any custom tags you want to use for products, one per line.
{% hint style="success" %}
**Tags**
Tags allow you to select a number of tags that suit the product. Some tags are predefined by Supply'd and are used to match particular product types. For example, whether the product is vegan, vegetarian, nut free, gluten free etc. Customers can use tags to find, for example, all vegan products that match a given search query. Tags are selected when adding or updating a product.
👉 See the [Adding Products](/supplyd-erp/products/adding-products.md) document for how to add tags to a product.
{% endhint %}
***
{% endstep %}
{% step %}
### Predict & Scan
Choose your settings for predictions and ordering defaults.

**Default Sales Period (Days)\* \[required field]**
Enter a default sales period, in days. If the delivery period for a supplier or item is unknown, this period will be used for the predicted sales period.
**Default Min. Stock Hold (Units)\* \[required field]**
Enter a default minimum stock hold. If no minimum stock hold is set for an item, this default minimum stock hold will be used instead.
**Ignore Non-working Days**
Choose whether or not to ignore non-working days in sales predictions.
If you don't typically receive orders while your business is closed we recommend setting this to "**Yes**" to prevent non-trading days skewing-down sales predictions.
**Ignore Purchase Orders Beyond (Days)**
For stock on order when using Scan to Order, enter the number of days an order should remain active before being ignored. This helps prevent orders that don't get received affecting the ordering for too long. Set to "0" to not consider purchase orders when ordering.
**Auto-apply Predictions**
When an order recommendation is made using Scan to Order, choose whether or not **Auto-apply** should automatically apply the prediction upon scanning.
**Auto-apply Default**
Enter the default quantity to order when the prediction is zero. Set to "0" to prevent auto-applying if no sales are predicted.
**Prediction Method**
Select the method used to predict future sales.
{% hint style="success" %}
**Trend (Internal Patterns)**
* What it is: A "rearview mirror" look at where we’ve been.
* Data Source: Internal only. It uses the numbers we enter into our own systems (e.g., past sales, ticket volume).
* How it works: It identifies a general direction (up, down, or flat) and assumes that path will continue.
* Best for: Identifying long-term growth or decline without worrying about outside interference.
**Forecast (Holistic Predictions)**
* What it is: A "GPS" that predicts the road ahead by looking at the whole environment.
* Data Source: Internal + External. It combines our data with outside factors like:
* Public and School Holidays
* Weather/Temperature patterns
* Temporal and seasonal trends
* The "One-Year" Rule: To work accurately, a forecast requires at least 12 months of data. This allows the system to recognise "Seasonality"- ensuring it doesn't mistake a standard holiday spike for a permanent trend.
* Best for: Budgeting, staffing, and inventory where outside events impact our daily volume.
This is part of Supply'd's AI Forecasting (see the [Supply'd Intelligence](/supplyd-erp/supplyd-intelligence.md) documents).
{% endhint %}
**Stats Collection Time**
Select the time of day that product stats are collected, in your local timezone.
***
{% endstep %}
{% step %}
### Product Pricing
Choose your product pricing settings.
**Sell Product Price Input**
Select whether or not product prices should be added including or excluding tax when adding in Supply'd.
Select **Yes** to include tax, or **No** to exclude it.
**Price Change Effective Time**
Select the time of day that price changes come into effect.
**Target Margin**
Enter the ideal minimum margin you would like for products you sell. This is used for the colour indicator on margins when editing a product.
**Margin Rounding**
Enter a decimal value to round pricing when setting a specific margin on a price.
***
{% endstep %}
{% step %}
### Product Defaults
**Default Item Weight (kg)**
Enter a fallback weight to use for items where the weight is not defined in kilograms.
**Default Dimensions (cm)**
Enter a fallback dimension to use for items where the dimension is not defined in centimetres.
***
{% endstep %}
{% step %}
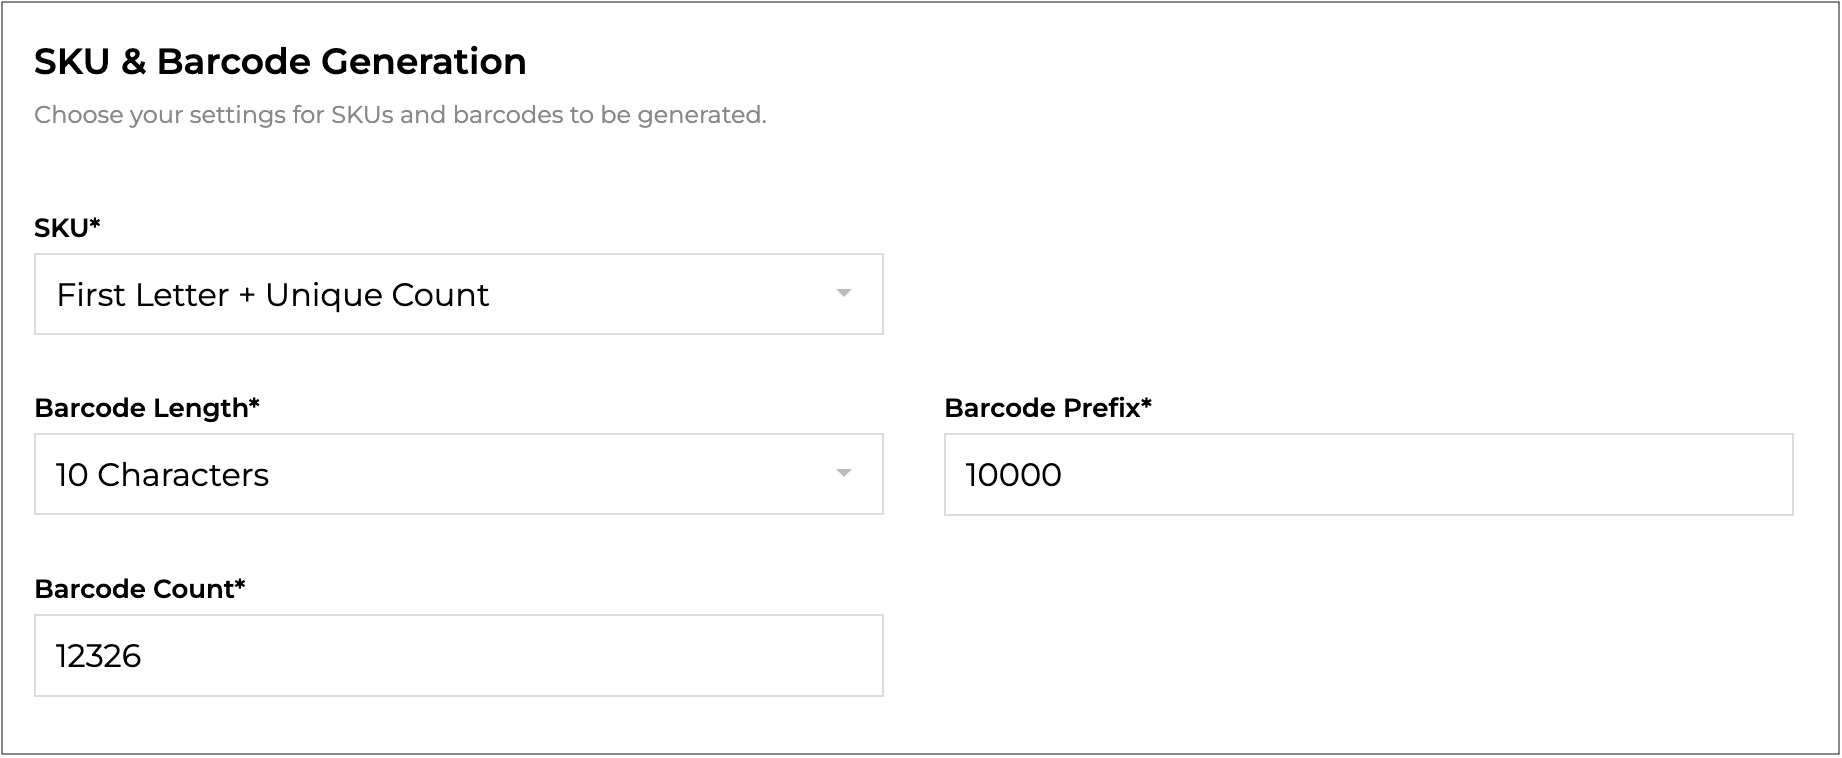
### SKU & Barcode Generation
**SKU\* \[required]**
Select the format to use when generating a SKU.
* **First Letter + Unique Count**\
Will generate the SKU using the first letter of the brand and name (5 characters max), followed by a unique count starting from 01.
* **First Letter + Size + Unique Count**\
Will generate the SKU using the first letter of the brand and name (5 characters max), followed by the size and a unique count starting from 01.
* **First Letter + Carton QTY + Unique Count**\
Will generate the SKU using the first letter of the brand and name (5 characters max), followed by the carton qty and a unique count starting from 01.
* **First Letter + Size + Carton QTY + Unique Count**\
Will generate the SKU using the first letter of the brand and name (5 characters max), followed by the size, carton qty and a unique count starting from 01.
* **Count**\
Will generate the SKU using numbers only, by counting up from the count provided in "Next Count". When this is selected an extra field, **SKU Next Count\*** (this is a required field), will show:\
\
* **SKU Next Count\* \[required field when Count is selected]**\
The next value of the SKU count.
**Barcode Length\* \[required field]**
Select the length for generating barcodes, choosing between 10 and 14 characters.
**Barcode Prefix\* \[required field]**
Enter the prefix to use for generated barcodes. The prefix will be used in combination with the count to generate the barcode.
**Barcode Count\* \[required field]**
Enter the next value for the generated barcodes.
If the count or prefix length is shorter than the requested barcode length, additional zeros will be added before the count to ensure the right length is generated.
***
{% endstep %}
{% step %}
### Product Labels
**Default Font\* \[required field]**
Select the default font to use for text on product labels.
**Label Text**
Enter freeform text from the product labels. Can be used to provide required label information such as a company address.
**Storage Info - Ambient**
Add storage information to include for ambient products.
**Storage Refrigerated - Ambient**
Add storage information to include for refrigerated products.
**Storage Info - Frozen**
Add storage information to include for frozen products.
**Label Logos**
Add logos to use on product labels. New logos can be uploaded by clicking on **Choose File**.
{% hint style="success" %}
The **Logo Labels** list can be reorganised by clicking and dragging on the 3 lines on the right beside the logo.
{% endhint %}
{% hint style="info" %}
Logos can be removed from the list by clicking the **X** beside the logo.
{% endhint %}

***
{% endstep %}
{% step %}
### Product Tickets
**Default Font\* \[required field]**
Select the default font for text on shelf tickets or talkers. This can be overridden when generating individual tickets or talkers.
**Sale Colour**
Choose the colour for sale text and bubbles on labels.
**Swatch Colour 1 to 6**
Choose a swatch colour for easy reference on the product print screen.
***
{% endstep %}
{% step %}
### Gift Note Settings
**Note Message Field**
Select how to find the message data to populate the gift note from the order item data.
**Meta Field Key**
Enter the meta field key to look for the message content.
***
{% endstep %}
{% step %}
### Nutritional Info
Set up additional nutritional information rows than what Supply'd has by default.
**Nutrient Name**
Select the nutrient name from the drop-down menu.
**Daily Intake**
What the daily intake for this nutrient is.
Click to add any additional nutrients.
***
{% endstep %}
{% step %}
### Custom Fields
Add custom product fields to store and manage specific information unique to your business.

To add a custom field click . Complete the fields as follows:
**Field Name**
A name for the custom field. This will be displayed as the label product screen for this field.
**Field Type**
Select the type of field for this custom field - **Short Text**, **Long Text** or **Drop Down**.
**Default Text**
Enter the default text to pre-fill this field. Leave blank to not pre-fill this field.
**Required**
Choose whether or not the field is a required field.
Repeat for any other custom fields you require.
***
{% endstep %}
{% step %}
#### Click Save
Click to apply your settings.
{% endstep %}
{% endstepper %}
---
# Agent Instructions
This documentation is published with GitBook. GitBook is the documentation platform designed so that both humans and AI agents can read, navigate, and reason over technical content effectively. Learn more at gitbook.com.
## Querying This Documentation
If you need additional information that is not directly available in this page, you can query the documentation dynamically by asking a question.
Perform an HTTP GET request on the current page URL with the `ask` query parameter:
```
GET https://help.supplyd.co/supplyd-erp/settings/product-settings.md?ask=
```
The question should be specific, self-contained, and written in natural language.
The response will contain a direct answer to the question and relevant excerpts and sources from the documentation.
Use this mechanism when the answer is not explicitly present in the current page, you need clarification or additional context, or you want to retrieve related documentation sections.