> For the complete documentation index, see [llms.txt](https://help.supplyd.co/llms.txt). Markdown versions of documentation pages are available by appending `.md` to page URLs; this page is available as [Markdown](https://help.supplyd.co/supplyd-erp/settings/device-set-up.md).
# Device Set-Up
Device Set-up in Supply’d allows you to add and manage printers and scales, helping streamline production, improve accuracy, and ensure devices are available where they’re needed.
Device Set-up in Supply’d allows you to add, configure and manage connected printers and scales. By setting up devices in one central location, you can ensure they are available for production, labelling, weighing, and other operational tasks. Effective device management helps improve accuracy, streamline workflows, and support efficient day-to-day operations.
This document will take you through the steps for:
* [#the-devices-page](#the-devices-page "mention")
* [#adding-a-printer](#adding-a-printer "mention")
* [#editing-printer-settings](#editing-printer-settings "mention")
* [#removing-a-printer](#removing-a-printer "mention")
* [#adding-a-scale](#adding-a-scale "mention")
* [#editing-scale-settings](#editing-scale-settings "mention")
* [#removing-a-scale](#removing-a-scale "mention")
***
## The Devices Page
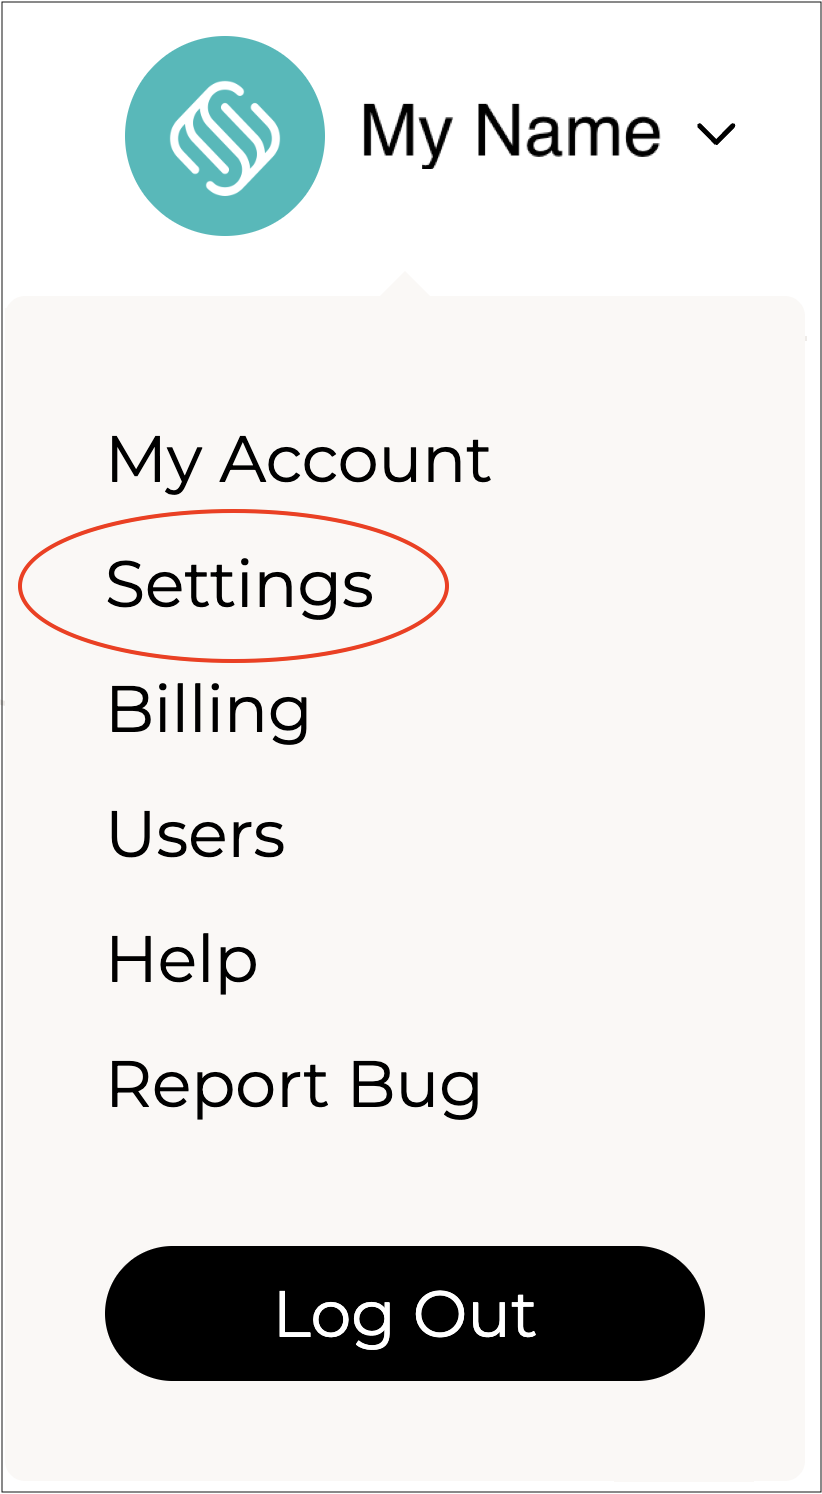
Click on your company name in the top right to open a menu.
Select **Settings** to open the **Settings** menu.

Scroll down and select **Device Set-up** from the **Settings** menu. The **Devices** page will open.

You will see 2 tabs on this page - **Printers** and **Scales**.
#### Printers
The **Printers** tab lists all printers that have been added for use with Supply’d. From this page, you can manage existing printers and add new ones.
{% hint style="success" %}
Printers in the list are tagged and colour-coded with and on the **Printers** list for easy identification.
{% endhint %}
{% hint style="success" %}
You can rearrange the **Printers** list by clicking and dragging the three lines next to a printer’s name to the desired position.
{% endhint %}
#### Scales
The Scales tab lists all scales that have been added for use with Supply’d. From this page, you can manage existing scales, configure their settings, and add new scales for use in production and weighing processes.
***
## Adding a Printer
{% stepper %}
{% step %}
#### Go to Device Set-up
1. Click on your company name in the top right and select **Settings**.
2. Scroll down and select **Device Set-up** from the **Settings** menu. A list of any printers used for Supply'd will show.

***
{% endstep %}
{% step %}
#### Click Add+
To add a new printer, click the **Add +** button in the top right corner.
The **Add Printer** form will open.
{% hint style="info" %}
The Label and WiFi sections will look different depending on whether your printer is connected via WiFi or Bluetooth. The screenshot above shows the options for a WiFi connection; the one below is for Bluetooth.
{% endhint %}
\
Complete the sections as per the guidelines below:
***
{% endstep %}
{% step %}
### Add Printer Details
**Name\*** **\[required field]**
Enter a reference name for the printer.
**Printer Location\* \[required field]**
Select the location where the printer is located.
👉 See the [Locations](/supplyd-erp/settings/locations.md) document for how to set up your locations.
**Printer Type\* \[required field]**
Select the type of printer being used.
* **Label:** A printer that is used to print labels.
* **Receipt:** A printer that is used to print receipts.
**Connection Type\* \[required field]**
Select the type of connection this printer uses.
* **Wifi:** A printer that uses Wifi to connect. (The printer must be on the same Wifi connection as the scanner to work.)
* **Bluetooth:** A printer that uses Bluetooth to connect.
**Size\* \[required field]**
Specify the standard paper size for the printer in millimetres.
**Language\* \[required field]**
Select the print language this printer uses.
* **TSPL:** A printer that uses TSPL as it's language. This is commonly used for a Wifi label printer.
* **ESC/POS:** A printer that uses ESC/POS as it's language. This is commonly used for a Receipt or Bluetooth printer.
***
{% endstep %}
{% step %}
### Label Settings - WiFi Connection
Label settings for use with a WiFi-connected printer.
**Print Direction**
Select the direction of the label print - either **Normal** or **Reverse**.
**DPI\* \[required field]**
Enter the DPI this printer uses.
{% hint style="success" %}
The DPI can be often found in the printer specification or in a printer self test.
{% endhint %}
***
{% endstep %}
{% step %}
### Label Settings - Bluetooth Connection
**Print Direction**
Select the direction of the label print - either **Normal** or **Reverse**.
{% hint style="info" %}
This section will not show for receipt type printers.
{% endhint %}
***
{% endstep %}
{% step %}
### WiFi Settings
Use this option if your printer connects via **WiFi**.
**IP\*** **\[required field]**
The IP this printer uses on the Wifi network. This is commonly printed by the printer in its printer self-test or when the printer first connects to the Wifi network. This may change over time and may need to be updated if the connection resets.
**Port\* \[required field]**
The port this printer uses on the Wifi network. A printer will commonly use the port 9100 by default.
{% hint style="info" %}
This section will not appear for receipt type printers.
{% endhint %}
***
{% endstep %}
{% step %}
### Bluetooth Settings
Use this option if your printer connects via **Bluetooth**.
**Mac Address**
The MAC (Media Access Control) Address for this printer.
{% hint style="success" %}
Clicking on will bring up a list of Bluetooth devices for you to select from.
{% endhint %}
***
{% endstep %}
{% step %}
#### Save
Click to add the printer.
{% endstep %}
{% endstepper %}
***
### **Editing Printer Settings**
To edit a printer's details:
{% stepper %}
{% step %}
Click on your company name in the top right and select **Settings**.
{% endstep %}
{% step %}
Scroll down and select **Device Set-up** from the **Settings** menu. The **Printers** list will open.
{% endstep %}
{% step %}
Click on the printer you would like to edit the settings for. The **Edit Printer** form will open.
{% endstep %}
{% step %}
Change any details required following the guidelines above for [#adding-a-printer](#adding-a-printer "mention").
{% endstep %}
{% step %}
Click to apply your settings.
{% endstep %}
{% endstepper %}
***
### Removing a Printer
To remove a printer:
{% stepper %}
{% step %}
Click on your company name in the top right and select **Settings**.
{% endstep %}
{% step %}
Scroll down and select **Device Set-up** from the **Settings** menu. The **Printers** list will open.
{% endstep %}
{% step %}
Click on the printer you would like to remove. The **Edit Printer** form will open.
{% endstep %}
{% step %}
Click on the 3 dots in the top right of the **Edit Printer** form and select **Remove Printer**.

You will be asked to confirm.
Click .
{% endstep %}
{% endstepper %}
***
## Adding a Scale
{% hint style="success" %}
**Integrated Scales** is currently available as a **private beta** and supports **Wedderburn scales**.
{% endhint %}
{% stepper %}
{% step %}
#### Go to Device Set-up
1. Click on your company name in the top right and select **Settings**.
2. Scroll down and select **Device Set-up** from the **Settings** menu. A list of any printers used for Supply'd will show.
3. Got to the **Scales** tab to see a list of any scales that have been added.

***
{% endstep %}
{% step %}
#### Click Add+
To add a new scale, click the **Add +** button in the top right corner.
The **Add Scale** form will open.
***
{% endstep %}
{% step %}
#### Complete the Form
**Name\* \[required field]**
Enter a clear name for the scale so it can be easily identified (eg. *Production Floor Scale* or *Packing Bench Scale*).
**Number\* \[required field]**
Enter the unique number or identifier for the scale. This is used by the system to distinguish it from other connected scales. The **Scale Number** will be provided by **Wedderburn** when you install the physical scales.
***
{% endstep %}
{% step %}
#### Click Save
Click to add the scale.
{% endstep %}
{% endstepper %}
***
### Editing Scale Settings
To edit a scale's details:
{% stepper %}
{% step %}
Click on your company name in the top right and select **Settings**.
{% endstep %}
{% step %}
Scroll down and select **Device Set-up** from the **Settings** menu. The **Printers** list will open.
{% endstep %}
{% step %}
Go to the **Scales** tab and select the scales you would like to edit the settings for. The **Edit Scale** form will open.
{% endstep %}
{% step %}
Change any details required following the guidelines above for [#adding-scales](#adding-scales "mention").
{% endstep %}
{% step %}
Click to apply your settings.
{% endstep %}
{% endstepper %}
***
### Removing a Scale
To remove a scale:
{% stepper %}
{% step %}
Click on your company name in the top right and select **Settings**.
{% endstep %}
{% step %}
Scroll down and select **Device Set-up** from the **Settings** menu. The **Printers** list will open.
{% endstep %}
{% step %}
Go to the **Scales** tab and select the scale you would like to remove. The **Edit Scale** form will open.
{% endstep %}
{% step %}
Click on the 3 dots in the top right of the **Edit Scale** form and select **Remove Scale**.

You will be asked to confirm.
Click .
{% endstep %}
{% endstepper %}
---
# Agent Instructions
This documentation is published with GitBook. GitBook is the documentation platform designed so that both humans and AI agents can read, navigate, and reason over technical content effectively. Learn more at gitbook.com.
## Querying This Documentation
If you need additional information that is not directly available in this page, you can query the documentation dynamically by asking a question.
Perform an HTTP GET request on the current page URL with the `ask` query parameter, and the optional `goal` query parameter:
```
GET https://help.supplyd.co/supplyd-erp/settings/device-set-up.md?ask=&goal=
```
`ask` is the immediate question: it should be specific, self-contained, and written in natural language.
`goal` is optional and describes the broader end goal you are ultimately trying to accomplish on behalf of the user. GitBook uses it to tailor the answer towards what is most useful for that goal.
The response will contain a direct answer to the question and relevant excerpts and sources from the documentation.
Use this mechanism when the answer is not explicitly present in the current page, you need clarification or additional context, or you want to retrieve related documentation sections.

 and
and  on the **Printers** list for easy identification.
{% endhint %}
{% hint style="success" %}
You can rearrange the **Printers** list by clicking and dragging the three lines next to a printer’s name to the desired position.
{% endhint %}
#### Scales
The Scales tab lists all scales that have been added for use with Supply’d. From this page, you can manage existing scales, configure their settings, and add new scales for use in production and weighing processes.
on the **Printers** list for easy identification.
{% endhint %}
{% hint style="success" %}
You can rearrange the **Printers** list by clicking and dragging the three lines next to a printer’s name to the desired position.
{% endhint %}
#### Scales
The Scales tab lists all scales that have been added for use with Supply’d. From this page, you can manage existing scales, configure their settings, and add new scales for use in production and weighing processes.


 will bring up a list of Bluetooth devices for you to select from.
{% endhint %}
will bring up a list of Bluetooth devices for you to select from.
{% endhint %}
 to add the printer.


 .
.


 to add the scale.

