> For the complete documentation index, see [llms.txt](https://help.supplyd.co/llms.txt). Markdown versions of documentation pages are available by appending `.md` to page URLs; this page is available as [Markdown](https://help.supplyd.co/supplyd-erp/purchase-orders/receiving-purchase-orders.md).
# Receiving Purchase Orders
Receiving orders in **Supply’d** helps you keep your stock levels accurate and up to date. When a supplier delivery arrives, you can easily record what was received, check for any missing or damaged items, and update your inventory automatically - ensuring your records always match what’s in your storeroom.
There are several ways to receive an order with Supply'd - on the app or using one of the Supply'd handheld scanners.
{% hint style="success" %}
👉 The [Receiving Orders (Scanner)](/supplyd-erp/scanner/receiving-orders-scanner.md) document can show you how to do this using a Supply'd handheld scanner.
👉 See the [Receiving Stock](/supplyd-erp/inventory/receiving-stock.md) and [Receiving Stock (Scanner)](/supplyd-erp/scanner/receiving-stock-scanner.md) documents for guidelines on receiving stock not associated with a purchase order.
{% endhint %}
This document will guide you through the receiving process on the app.
* [#receiving-an-order](#receiving-an-order "mention")
* [#adding-batch-data](#adding-batch-data "mention")
* [#additional-options](#additional-options "mention")
***
## Receiving an Order
{% stepper %}
{% step %}
#### Go to the Purchases Page
Select **Purchases** from the main menu.
The **Purchases** page lists all the purchase orders you have placed with suppliers in Supply'd.
***
{% endstep %}
{% step %}
#### Select the Order
Select the order you’re receiving from the list to open its details and begin the receiving process.
***
{% endstep %}
{% step %}
#### Select Receive Order
Click on the 3 dots on the top right-hand corner and select **Receive Order**.
The **RECEIVING** page will open.

***
{% endstep %}
{% step %}
#### Count & Record
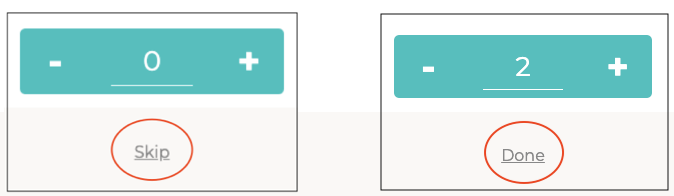
The **Receiving** page has a list of the items for this order with the first one opened. Clicking on the **0** will highlight it and allow you to type in the number of that item that you have received in the order. Alternatively, click on the **+** to add the number. If that number matches that in the order, it will automatically move to the next item.
{% hint style="warning" %}
If you have an item in the order that was not received, or you want to go back to that item later, you can click **Skip**.
If you have an item in the order which you received less than that in the order, add the amount then click **Done** to move to the next.
{% endhint %}
{% hint style="warning" %}
If you enter a quantity higher than what was ordered - for example, you ordered 10 unicorns but entered 11 - an audible beep will sound, and the count will stay yellow instead of turning green. This allows you to review and confirm the details before proceeding.
Similarly, if you enter a quantity lower than what was ordered, the count will remain yellow and the system will not automatically move to the next item. However, there will be no audible beep.
{% endhint %}
***
{% endstep %}
{% step %}
#### Add Batch Data
Batch data can be optionally added if you want to track specific production or delivery batches for the received items.
👉 See [#adding-batch-data](#adding-batch-data "mention") below.
***
{% endstep %}
{% step %}
#### Repeat
Repeat steps 4 and 5 for all remaining items in the order.
***
{% endstep %}
{% step %}
#### Perform Additional Actions
Perform any additional actions as needed, such as adding notes, updating quantities, or attaching documents.
👉 See [#additional-options](#additional-options "mention") below.
***
{% endstep %}
{% step %}
#### Click Finalise
Once all items have been checked, click to complete the receiving process.
{% hint style="info" %}
The button will remain grey until all items in the order have been fully received. You can still click it to finalise the receipt, but any unreceived items will not be added to inventory.
{% endhint %}

You will be asked to confirm.
Once the receipt has been finalised, the order status will update to , and any received stock will be added to inventory for tracking.
{% hint style="info" %}
If an order is only partially received, the order will change to . If you are expecting the remaining items, you can receive the remaining items by returning to the order and clicking on the 3 dots in the top right corner, selecting **Receives**, then **Receive More Items**.
This will bring up a new receive for the remaining items. If you are not expecting the missing item you should mark the order as completed so the system doesn't incorrectly show items as on order. Click on the 3 dots in the top right, select **Mark As**, then **Completed**.
**Note:** Only items that weren’t received at all (zero quantity) can be received later. Partially received items won’t appear again, so you’ll need to manually receive the remaining stock.
👉 See [Receiving Stock (Scanner)](/supplyd-erp/scanner/receiving-stock-scanner.md) .
{% endhint %}
{% hint style="success" %}
👉 See the [Receiving Stock](/supplyd-erp/inventory/receiving-stock.md) and [Receiving Stock (Scanner)](/supplyd-erp/scanner/receiving-stock-scanner.md) documents for guidelines on receiving stock not associated with a purchase order.
{% endhint %}
{% endstep %}
{% endstepper %}
***
## Adding Batch Data
If you would like to assign batch information such as a batch number, expiry date, etc. to items when receiving, click on the 3 dots in the **Batch Data** field.

There are 4 options in this menu:
***
#### Edit Batch
Allows you to assign any batch information to an item being received such as batch code, pricing, expiry and production date. Selecting this will open the **Edit Batch Data** form.
**Batch Code (Optional)**
An optional batch code reference for this item.
**Cost of Goods (ex tax)**
The cost of goods for a unit (or what is defined in your inventory carton quantity, if not units). This is used for margin calculations when the item is sold. You can press **FILL BUY PRICE** to pull the current average buy price if it is empty.
**Carton Price (ex tax)**
The price for 1 carton when ordered (if ordering in units or the same as the inventory carton qty, this should match the COGS \[Cost of Goods] field above). Adjusting this price will automatically update the COGS relative to the carton qty. A new price will also update the original purchase order to match the price inputted.
**Production Date (Optional)**
The date the product was produced. Select the day, month and year from the calendar.
**Expiry Date (Optional)**
The expiry date of the batch. Select the day, month and year from the calendar.
**Expiry Type**
The type of expiry - either **Best Before** or **Use By** - selected from the drop-down. If the **Expiry Date** is not provided this field will be ignored.
**Quality Control**
Select whether or not this product passed the quality control check.
{% hint style="info" %}
This field will only show if set in the [Order Settings](/supplyd-erp/settings/order-settings.md#receiving-orders) section of your [Order Settings](/supplyd-erp/settings/order-settings.md).
{% endhint %}
{% hint style="warning" %}
If you receive defective stock, make sure to mark it as **Defective**. This will notify the QC manager via email, allowing them to inspect the stock and write it off if necessary.
{% endhint %}
**Notes**
Optionally, add any notes relevant to this batch.
**Attachments**
Attach files to a batch. For example, businesses can store Certificates of Analysis (CoA) or other relevant documents directly against batches for easy access. Simply click **Choose File** and select the file you want to attach.
{% hint style="success" %}
If you have multiple files attached, you can rearrange them by clicking the 3 lines next to the file name and dragging them into your preferred order.
{% endhint %}
Click to apply this information to the batch.
***
#### Match Batch
Allows you to match the batch with an existing batch in the system.
Select the batch that you would like to match, click and the batch information will be copied to the current item.
***
#### Split Batch
If there are different batches being received for the same item you can use this to split into another batch. You can then choose one of the options above to add different batch information and the applicable quantities.
***
#### Edit Bin Location
Allows you to enter location information for this item.
Click to apply it to the batch.
***
{% hint style="success" %}
If you are assigning batches to most items you may find the **Auto Next** function that is on by default problematic.
If you want to disable the receive automatically jumping to the next item after the quantity has been selected:
1. Click on your name in the top right corner and select **Settings**.
2. In the **Settings** menu, select **Order Settings.**
3. Scroll down to **Receiving Orders**, for **Auto Next** select **Never** and click .
This will prevent the system from automatically jumping to the next product.
{% endhint %}

***
## Additional Options
There are a number of additional features within the receive order menu (3 dots in the top right) against the order:
#### Finalise Receive
An alternative to the button. Use this option to complete the receiving process and add the relevant items to your inventory. Make sure all items on the order have been received before finalising.
***
#### Receive **All**
Receive all items on the order and finalise. You will be asked to confirm. Do not use this function if you need to assign batch information or check stock.
\
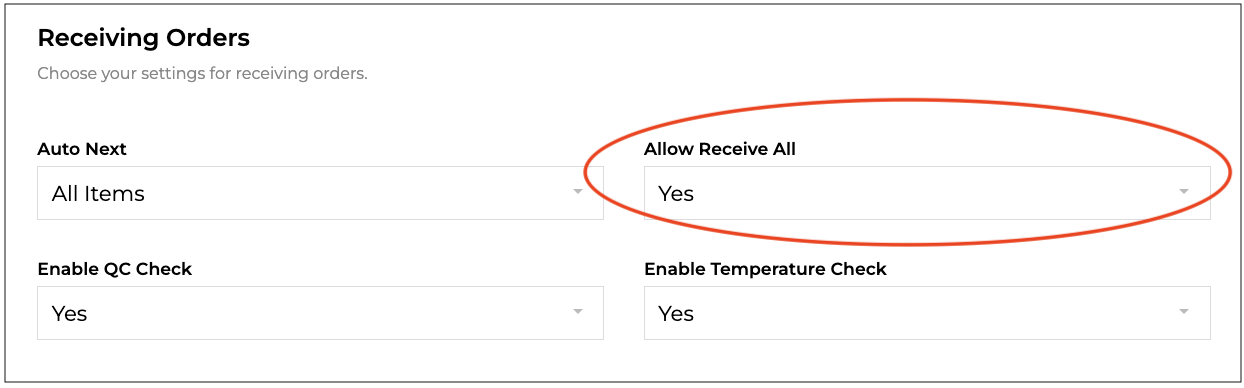
Disabled by default, to enable **Receive All**:
1. Click on your name in the top right and select **Settings.**
2. Scroll to the **Receiving Orders** section.
3. Select **Yes** from the drop-down menu in the **Allow Receive All** field.
***
#### Change Location
If you have multiple locations and need to change the location you are receiving into.
Click to apply the change.
***
#### Actions >
####
**Add Item (Custom type Suppliers only)**
Opens the **Add Item** form allowing you to add extra items to a purchase order during receiving - ideal for when a supplier sends the wrong or substitute stock, but you're still happy to accept it.\
\
Slect the item, add the quantity and click .
**Print Product Labels**
Print shelf labels for your items.
**Attach File**
Allows you to attach files to the purchase order such as invoices, receipt, packing list, images etc. Useful if you would like to digitalise invoice management or store details of damaged goods etc.
Select the file type, choose the file and click .
***
#### Cancel Receive
Cancel the receive, all batch and receive data will be removed. You will be asked to confirm.
Click .
***
## Order Activity
When viewing a receive, you will see there is an **Order Activity** section at the bottom of the page. This lists any activity there has been on the order, such as, when the order was placed, paid, received etc.
Clicking **View Receive** allows you to view details of the **Receive** from this section.
You also have the option to add an internal note. Simply click , enter your note, then click to add it to the **Order Activity**.
{% hint style="success" %}
👉 If you need to receive in items that are not associated to an order you would instead use the [Receiving Stock](/supplyd-erp/inventory/receiving-stock.md) function which is for receiving items not associated to an order.
{% endhint %}
---
# Agent Instructions
This documentation is published with GitBook. GitBook is the documentation platform designed so that both humans and AI agents can read, navigate, and reason over technical content effectively. Learn more at gitbook.com.
## Querying This Documentation
If you need additional information that is not directly available in this page, you can query the documentation dynamically by asking a question.
Perform an HTTP GET request on the current page URL with the `ask` query parameter:
```
GET https://help.supplyd.co/supplyd-erp/purchase-orders/receiving-purchase-orders.md?ask=
```
The question should be specific, self-contained, and written in natural language.
The response will contain a direct answer to the question and relevant excerpts and sources from the documentation.
Use this mechanism when the answer is not explicitly present in the current page, you need clarification or additional context, or you want to retrieve related documentation sections.