# Running & Viewing a Report
With Supply'd you have the capability of running a multitude of reports, from sales to purchases to customers and write-offs, over various time periods, giving you an overview of your sales and purchases, both in table and graph format with the ability to compare various sales periods. You can also search, download and filter these reports.
This document will guide you through:
* [#the-reports-page](#the-reports-page "mention")
* [#running-and-viewing-a-report](#running-and-viewing-a-report "mention")
* [#saving-and-automating-reports](#saving-and-automating-reports "mention")
* [#common-discrepancies-gotchas-why-reports-dont-always-match](#common-discrepancies-gotchas-why-reports-dont-always-match "mention")
* [#searching-a-report](#searching-a-report "mention")
* [#downloading-a-report](#downloading-a-report "mention")
* [#filtering-a-report](#filtering-a-report "mention")
***
## The Reports Page
The **Reports** page in Supply’d is where you can view and analyse key business data across orders, sales, customers, and operations. It’s designed to give you a clear overview of performance and help you make informed decisions based on real-time and historical information.

Reports can read from various date references (order, delivery, shipped, and completed) and product identifiers (SKU, barcode or carton barcode), depending on your preferences.
👉 See the [Report Settings](/configuring-supplyd/settings/report-settings.md) document for instructions for setting those.
***
### Saved Reports
The **Saved Reports** tab is where you can view and manage all reports you’ve created and saved so you can reuse it without needing to set it up again each time. From here, you can quickly access existing reports, see their current status (such as manual or scheduled), and identify them using colour-coded indicators.
{% hint style="success" %}
**Saved Reports** have colour-coded statuses beside them for easy identification:
* - Manual reports are run only when you choose to generate them.
* - Scheduled reports run automatically based on a set frequency, date, and time, and are sent to selected recipients.\
👉 See the [#saving-and-automating-reports](#saving-and-automating-reports "mention") section below.
{% endhint %}
You can also open a saved report to view or edit its settings, including frequency, recipients, and automation schedules.
{% hint style="success" %}
When you click on a saved report, you will be taken back to the first tab, where a “Currently viewing…” indicator will show the report you’ve selected.
{% endhint %}
***
## Running & Viewing a Report
The first menu, which initially says **Sales**, gives you this selection:
* [#sales-1](#sales-1 "mention")
* [#margins](#margins "mention")
* [#purchases](#purchases "mention")
* [#production](#production "mention")
* [#inventory](#inventory "mention")
* [#write-offs](#write-offs "mention")
* [#pick-pack](#pick-pack "mention")
* [#tasks](#tasks "mention")
* [#customers](#customers "mention")
The second menu, which initially says **By Channel**, will depend on the selection in the first menu. Column headings in the report, shown below for each menu selection, will also vary depending on the menu choices.
Click on the tabs in one of the 2 tables below, or the links above, to see the second menu options and table headings for each selection.
{% tabs fullWidth="false" %}
{% tab title="Sales" %}
### Sales
Gives you an overview of all your sales within your selected time frame, sorted by the highest **Gross Sales** to the lowest.
Clicking the little arrow beside the **Gross Sales** tab will allow you to switch the sort order from highest-to-lowest to lowest-to-highest dollar sales amounts.

#### By Channel
Will show you the following values through your various sales **Channels**, such as, Supply'd, Online Store, Shopify etc.
* **Gross Sales**
* **Net Sales**
* **Tax**
* **Average Sale** (in $)
* **Sales** (number of)
#### By Warehouse
The sales amounts for each **Warehouse** in dollar value and the number of sales.
* **Gross Sales**
* **Net Sales**
* **Tax**
* **Average Sale** (in $)
* **Sales** (number of)
#### By Product
The sales amounts for each **Product** in dollar value and the numbers sold. Clicking on the product name will open that product's page.
* **Gross Sales**
* **Net Sales**
* **Average Sale**
* **Tax**
* **Sales** (number of)
* **Qty** (quantity)
#### By Department
The sales amounts for each **Warehouse** in dollar value and the number of sales.
* **Gross Sales**
* **Net Sales**
* **Tax**
* **Average Sale**
* **Sales** (number of)
#### By Category
The sales amounts for each **Category** in dollar value and the numbers sold.
* **Gross Sales**
* **Net Sales**
* **Tax**
* **Average Sale**
* **Sales** (number of)
* **Qty** (quantity)
#### By Customer
The sales amounts for each **Customer** in dollar value and the numbers sold.
* **Gross Sales**
* **Net Sales**
* **Tax**
* **Average Sale**
* **Sales** (number of)
#### By Group
The sales amounts for each customer **Group** in dollar value and the numbers sold.
* **Gross Sales**
* **Net Sales**
* **Tax**
* **Average Sale**
* **Sales** (Number of)
#### By Delivery Date
The sales for each **Delivery Date**.
* **Order Number**
* **Customer Name**
* **Amount**
* **Tax**
* **Order Date**
* **Delivery Date**
* **Status**
#### By Sales Rep
The sales statistics for each **Sales Rep***.*
* **Gross Sales**
* **Net Sales**
* **Tax**
* **Average Sale**
* **Sales** (Number of)
#### By Date
* **Gross Sales**
* **Net Sales**
* **Average Sale**
* **Sales** (Number of)
{% hint style="success" %}
**True Sales**
To get true sales figures in Supply’d, use:
* **Sales > By Channel**
This report shows accurate totals because every sales order must have one (and only one) sales channel - no exceptions.
{% endhint %}
{% hint style="info" %}
**Gross vs Net Sales**
If tax (such as GST) is applied to all products:
**Gross Sales – Net Sales = Tax**
The difference between these figures should equal the Tax column.
{% endhint %}
{% hint style="success" %}
All results can be sorted by clicking on the column headings:
* **Channel**, **Product**, **Warehouse**, **Category**, **Group**, **Sale Rep** etc**:** Alphabetically - A–Z or Z–A.
* **Date:** Chronologically - earliest to latest or latest to earliest.
* **Sales** & **Tax:** Highest to lowest or lowest to highest amount.
* **Sales** (number of)**:** Highest to lowest or lowest to highest number.
{% endhint %}
{% endtab %}
{% tab title="Margins" %}
### Margins
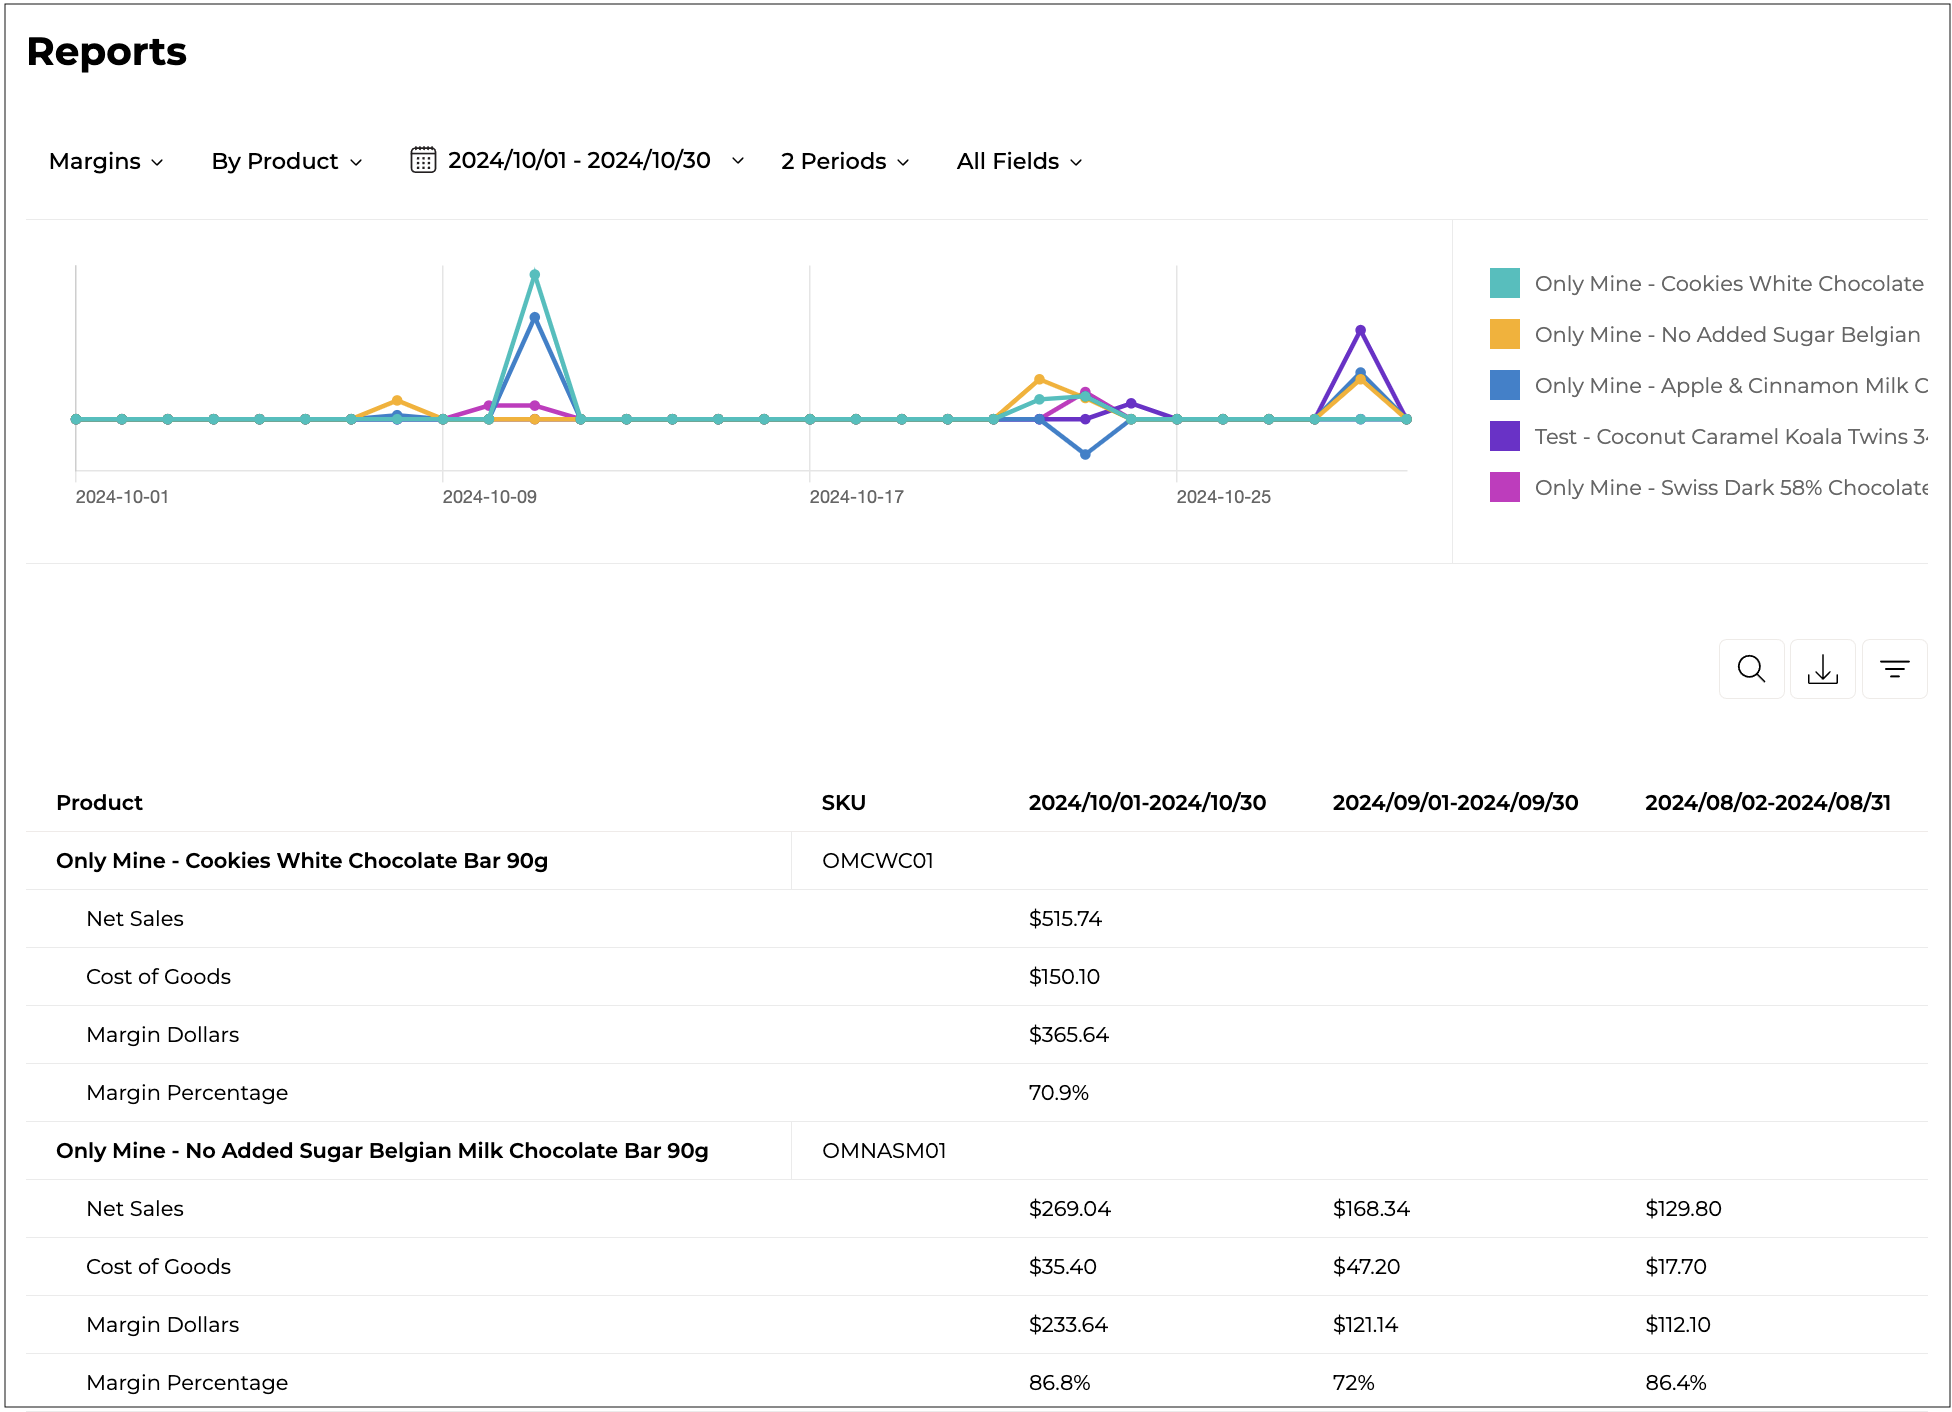
Gives you an overview of all your margins, both in dollar value and as a percentage, within your selected time frame, sorted by the highest **Margin Dollars** amount.

* **By Channel**
* **By Warehouse**
* **By Department**
* **By Product**
* **By Category**
* **By Customer**
* **By Group**
* **By Date**
All the second menu selections for **Margins** will give you the same report table headings, with the addition of an **SKU** column for **By Product**.
{% hint style="warning" %}
**Margin & Cost of Goods (COGS)**
Any report based on **Margin** requires Cost of Goods (COGS).
* COGS comes from batch information in Inventory.
* COGS is properly recorded when the full end-to-end process is followed in Supply’d (including using the Expenses module).
* If COGS = 0, then **Net Sales** for Margin reports will also show as 0.
* For margin reports to be accurate, clients must use both **Inventory and Expenses**.
Reports affected:
* **Margins > By (any option)**
* **Sales by Channel vs Margin by Channel** – Net Sales will not match if COGS is missing.
{% endhint %}
{% hint style="success" %}
All results can be sorted by clicking on the column headings:
* **Channel**, **Warehouse**, **Product**, **Department**, etc.**:** Alphabetically - A–Z or Z–A.
* **Sales**, **Cost of Goods** & **Margin Dollars:** Highest to lowest or lowest to highest amount.
* **Margin Percentage:** Highest to lowest or lowest to highest percentage.
{% endhint %}
{% endtab %}
{% tab title="Purchases" %}
### Purchases
Gives you an overview of all your purchases, both in dollar value and as a number purchased, within your selected time frame, sorted by the highest **Gross Purchases** amount.

#### By Supplier
* **Gross Purchases**
* **Net Purchases**
* **Average Purchase**
* **Purchases** (number of)
#### By Location
* **Gross Purchases**
* **Net Purchases**
* **Average Purchase**
* **Purchases** (number of)
* **Qty** (quantity)
#### By Department
* **Gross Purchases**
* **Net Purchases**
* **Average Purchase**
* **Purchases** (number of)
* **Qty** (quantity)
#### By Product
{% hint style="success" %}
Clicking on the product name will open that product's page.
{% endhint %}
* **SKU**
* **Gross Purchases**
* **Net Purchases**
* **Average Purchase**
* **Purchases** (Number of)
* **Qty** (quantity)
#### By Category
* **Gross Purchases**
* **Net Purchases**
* **Average Purchase**
* **Purchases** (Number of)
* **Qty** (quantity)
{% hint style="success" %}
All results can be sorted by clicking on the column headings:
* **Supplier**, **Location**, **Department**, **Product**, etc.**:** Alphabetically - A–Z or Z–A.
* **SKU:** Alphabetically - A–Z or Z–A, then numerical - highest to lowest or lowest to highest number.
* **Purchases:** Highest to lowest or lowest to highest amount.
* **Purchases** (number of) & **Purchases:** Highest to lowest or lowest to highest number.
{% endhint %}
{% endtab %}
{% tab title="Production" %}
### Production
Gives you an overview of all your production, both in dollar value and as a number, within your selected time frame, sorted by the highest **Actual Yield** amount.
#### By Warehouse
* **Actual Yield**
* **Qty** (quantity)
* **Cost of Goods**
#### By Product
{% hint style="success" %}
Clicking on the product name will open that product's page.
{% endhint %}
* **SKU**
* **Actual Yield**
* **Qty** (quantity)
* **Cost of Goods**
#### By Batch
{% hint style="success" %}
Clicking on the product name will open that product's Production Run details.
{% endhint %}
* **SKU**
* **Batch**
* **Expiry**
* **Actual Yield**
* **Qty** (quantity)
* **Cost of Goods**
#### By Category
* **Actual Yield**
* **Qty** (quantity)
* **Cost of Goods**
{% hint style="success" %}
All results can be sorted by clicking on the column headings:
* **Warehouse**, **Product**, **Category**, etc.**:** Alphabetically - A–Z or Z–A.
* **SKU:** Alphabetically - A–Z or Z–A, then numerical - highest to lowest or lowest to highest number.
* **Batch:** Highest to lowest or lowest to highest number.
* **Expiry:** Chronologically - earliest to latest or latest to earliest.
* **Yields** & **Qty:** Highest to lowest or lowest to highest number.
* **Cost of Goods:** Highest to lowest or lowest to highest amount.
{% endhint %}
{% endtab %}
{% tab title="Inventory" %}
### Inventory
Gives you an overview of all your inventory, both as a number and in dollar value, within your selected time frame, sorted by various amounts as listed.

#### By Warehouse
Sorted by Stock On Hand
* **Stock On Hand**
* **Stock Available**
* **Cost Value**
* **Sale Value**
#### By Product
Sorted by Stock On Hand.
{% hint style="success" %}
Clicking on the product name will open that product's **Manage Stock** page.
{% endhint %}
* **SKU**
* **Stock On Hand**
* **Stock Available**
* **Cost Value**
* **Sale Value**
#### By Batch
Sorted by Expiry
{% hint style="success" %}
Clicking on the product name will open the batch details.
Clicking on the product name in the batch details will open that product's page.
{% endhint %}
* **SKU**
* **Batch**
* **Expiry**
* **Stock Available**
* **Cost Value**
* **Sale Value**
{% hint style="success" %}
This is a good report to run to see products that may be past, at, or close to their expiry or best before dates.
{% endhint %}
#### By Category
Sorted by Stock On Hand. Clicking the little arrow beside the **Stock On Hand** tab will allow you to switch the sort order from highest-to-lowest to lowest-to-highest.
* **Stock On Hand**
* **Stock Available**
* **Cost Value**
* **Sale Value**
#### By Product On Order
Sorted alphabetically by product name. The sort order can be changed to Z-A by clicking the little arrow beside **Product**.
{% hint style="success" %}
Clicking on the product name will open that product's **Recent Sales Orders** page
{% endhint %}
* **SKU**
* **Stock On Hand**
* **On Order**
* **Stock Available**
* **Min Stock Hold**
* **Required**
#### By Days On Hand
Sorted by the highest Days On Hand value.
{% hint style="success" %}
Can sort by lowest to highest by clicking the arrow beside **Days On Hand**.
{% endhint %}
* **SKU**
* **Stock On Hand**
* **Stock Available**
* **Actual ROS**
* **Predicted ROS**
* **Days On Hand**
#### By Weeks On Hand
Sorted by the highest Weeks On Hand value.
{% hint style="success" %}
Can sort by lowest to highest by clicking the arrow beside **Weeks On Hand**.
{% endhint %}
* **SKU**
* **Stock On Hand**
* **Stock Available**
* **Actual ROS**
* **Predicted ROS**
* **Weeks On Hand**
#### By Months On Hand
Sorted by the highest Months On Hand value.
{% hint style="success" %}
Can sort by lowest to highest by clicking the arrow beside **Months On Hand**.
{% endhint %}
* **SKU**
* **Stock On Hand**
* **Stock Available**
* **Actual ROS**
* **Predicted ROS**
* **Months On Hand**
#### **By Feed**
* **Date**
* **Product**
* **SKU**
* **Batch**
* **Type**
* **Qty**
* **Old Count**
* **New Count**
{% hint style="success" %}
All results can be sorted by clicking on the column headings:
* **Warehouse** & **Product:** Alphabetically - A–Z or Z–A.
* **SKU:** Alphabetically - A–Z or Z–A, then numerical - highest to lowest or lowest to highest number.
* **Dates:** Chronologically - earliest to latest or latest to earliest.
* **Stock on Hand**, **Months on Hand**, **Batch Number**, **Qty, Counts**, etc.**:** Highest to lowest or lowest to highest number.
{% endhint %}
{% endtab %}
{% endtabs %}
{% tabs %}
{% tab title="Write Offs" %}
### Write Offs
Gives you an overview of all your write-offs, both as a number and in dollar value, within your selected time frame, sorted by the highest **Stock Written Off** amount.

#### By Type
* **Stock Written Off**
* **Cost Value**
* **Sale Value**
#### By Warehouse
* **Stock Written Off**
* **Cost Value**
* **Sale Value**
#### By Product
* **SKU**
* **Stock Written Off**
* **Cost Value**
* **Sale Value**
#### By Category
* **Stock Written Off**
* **Cost Value**
* **Sale Value**
#### By User
* **User**
* **Stock Written Off**
* **Cost Value**
* **Sale Value**
{% hint style="success" %}
All results can be sorted by clicking on the column headings:
* **Type**, **Product**, **Warehouse**, **User** etc**:** Alphabetically - A–Z or Z–A.
* **Date:** Chronologically - earliest to latest or latest to earliest.
* **Stock Written Off:** Highest to lowest or lowest to highest number.
* **Cost Value**, **Sales Value:** Highest to lowest or lowest to highest amount.
{% endhint %}
{% endtab %}
{% tab title="Pick/Pack" %}
### Pick/Pack
#### By Channel
* **Channel**
* **Orders Picked**
* **Orders Packed**
* **Items**
* **Avg Pick Time**
* **Avg Pack Time**
#### By Warehouse
* **Channel**
* **Orders Picked**
* **Orders Packed**
* **Items**
* **Avg Pick Time**
* **Avg Pack Time**
* **Avg Time From Order**
#### By Customer
* **Customer**
* **Orders Picked**
* **Orders Packed**
* **Items**
* **Avg Pick Time**
* **Avg Pack Time**
* **Avg Time From Order**
#### By Group
* **Group**
* **Orders Picked**
* **Orders Packed**
* **Items**
* **Avg Pick Time**
* **Avg Pack Time**
* **Avg Time From Order**
#### By Date
* **Group**
* **Orders Picked**
* **Orders Packed**
* **Items**
* **Avg Pick Time**
* **Avg Pack Time**
#### By Picker
* **User**
* **Orders Picked**
* **Orders Packed**
* **Items**
* **Avg Pick Time**
* **Avg Pack Time**
* **Avg Time From Order**
#### By Packer
* **User**
* **Orders Picked**
* **Orders Packed**
* **Items**
* **Avg Pick Time**
* **Avg Pack Time**
* **Avg Time From Order**
{% hint style="success" %}
All results can be sorted by clicking on the column headings:
* **Channel**, **Customer**, **Warehouse**, **User** etc**:** Alphabetically - A–Z or Z–A.
* **Date:** Chronologically - earliest to latest or latest to earliest.
* **Items**, **Orders Picked** & **Orders Packed:** Highest to lowest or lowest to highest number.
* **Avg Times:** Highest to lowest or lowest to highest time.
{% endhint %}
{% endtab %}
{% tab title="Tasks" %}
### Tasks
#### By Location
* **Location**
* **Tasks Completed**
* **Task Time**
* **Avg Task Time**
#### By Department
* **Department**
* **Tasks Completed**
* **Task Time**
* **Avg Task Time**
#### By Group
* **Group**
* **Tasks Completed**
* **Task Time**
* **Avg Task Time**
#### By Date
* **Date**
* **Tasks Completed**
* **Task Time**
* **Avg Task Time**
#### By User
* **Location**
* **Tasks Completed**
* **Task Time**
* **Avg Task Time**
{% hint style="success" %}
All results can be sorted by clicking on the column headings:
* **Locations, Departments & Users:** Alphabetically - A–Z or Z–A.
* **Dates:** Chronologically - earliest to latest or latest to earliest.
* **Tasks:** Highest to lowest or lowest to highest number.
* **Task Time** & **Avg Task Time:** Highest to lowest or lowest to highest time.
{% endhint %}
{% endtab %}
{% tab title="Customers" %}
### Customers
Gives you an overview of all your customers' purchases, both as a number and in dollar value, within your selected time frame, sorted by the highest **Last Order Date**.

#### By Customer
* **Orders** (number of)
* **Gross Sales**
* **Net Sales**
* **Last Order Date**
* **Date Created**
{% hint style="success" %}
All results can be sorted by clicking on the column headings:
* **Customer:** Alphabetically - A–Z or Z–A.
* **Orders** (number of)**:** Highest to lowest or lowest to highest number.
* **Gross Sales** & **Net Sales:** Highest to lowest or lowest to highest amount.
* **Dates:** Chronologically - earliest to latest or latest to earliest.
{% endhint %}
{% endtab %}
{% endtabs %}
***
### Comparison
This tab will show for all of the first column selections except for **Inventory** and \
**Customers**.

This tab allows you to compare statistics from the reports for the current period with previous periods. Selecting **Custom Periods** will open a **Compare Periods** form allowing you to input any number of periods. **No Comparison** will only show the data for the current period or the date range selected (see below).

When a comparison number of periods is selected, an **All Fields** tab will show, allowing you to select which fields you would like to compare values for.
***
### Report Date Term Selection
Date periods can be selected by clicking on the date in the top right-hand corner.

A **Custom Range** can be set by clicking on **Custom Range** and selecting the first and last date to be included in the report.

Click to set these dates.
***
## Saving & Automating Reports
Saving a report allows you to keep a configured report (with selected filters, columns, and settings) for future use without having to rebuild it each time. Once saved, it becomes accessible from the **Saved Reports** tab.
Automating a report takes this a step further by scheduling it to run and be sent automatically. You can set the frequency (eg. weekly or monthly), choose the date and time, and select recipients. This ensures the report is generated and delivered consistently without manual action.
To save or automate a report:
{% stepper %}
{% step %}
#### Run the Report
Run the report following the guidelines above for [#running-and-viewing-a-report](#running-and-viewing-a-report "mention").
***
{% endstep %}
{% step %}
#### Select Save Report
Click the 3 dots in the top right and select **Save Report**.
The **Edit Saved Report** form will open.
Complete the form following the guidelines below:
***
{% endstep %}
{% step %}
#### Enter a Name
The report will automatically be named based on the selections you make when creating it. You can change the name if desired.
***
{% endstep %}
{% step %}
#### Select the Date Range
Select the standard date range you would like to use to generate this report.
***
{% endstep %}
{% step %}
### Report Automation
The **Automation** section lets you schedule saved reports to be automatically generated and emailed. You can set how often they run, what time they’re sent, and who receives them, helping keep reporting consistent without manual effort.
#### Frequency\* \[required field]
Select how often a saved report is automatically generated and sent.
{% hint style="success" %}
The fields displayed in this section will vary depending on your selection.
{% endhint %}
#### Manual
The report is only generated when you run it yourself. It will not be sent automatically.
***
#### One-off
The report is generated and sent once at the scheduled time, then does not repeat.
* **Date:** Select the date you would like the report to be sent.
* **Recipients\* \[required field]:** Select the Users who will receive the report via email. You can select one or multiple recipients.
* **Send Time:** Select the time of day the report will be generated and sent.
***
#### Weekly
The report is automatically generated and sent on a weekly schedule at the selected time/day.
* **Days Of Week:** Select which specific day(s) the report will run. For example, if a report is set to run weekly, you can select one or more days such as Monday, Wednesday, or Friday. The report will only be generated and sent on the selected days at the specified time.
* **Recipients:** Select the Users who will receive the report via email. You can select one or multiple recipients.
* **Send Time:** Select the time of day the report will be generated and sent.
***
#### Monthly
The report is automatically generated and sent once per month at the selected date and time.
* **Start Date:** Select the first date the report will begin running. From that point onward, the report will continue to be generated on a monthly basis according to the schedule you’ve set.
* **Recipients:** Select the Users who will receive the report via email. You can select one or multiple recipients.
* **Send Time:** Select the time of day the report will be generated and sent.
***
{% endstep %}
{% step %}
#### Click Save
Click to add the report to the **Saved Reports** list.
{% endstep %}
{% endstepper %}
***
### Editing a Saved Report
To edit a saved report:
{% stepper %}
{% step %}
Select **Reports** from the main menu. Go to the **Saved Reports** tab and select the report you would like to edit.
{% endstep %}
{% step %}
Click on the 3 dots in the top right and select **Edit Saved Report** report.
The **Edit Saved Report** form will open.
{% endstep %}
{% step %}
Complete the form following the guidelines above for [#saving-and-automating-report](#saving-and-automating-report "mention").
{% endstep %}
{% step %}
Click to apply your changes.
{% endstep %}
{% endstepper %}
***
### Removing a Saved Report
To remove a saved report:
{% stepper %}
{% step %}
Select **Reports** from the main menu. Go to the **Saved Reports** tab and select the report you would like to remove.
{% endstep %}
{% step %}
Click on the 3 dots in the top right and select **Remove Saved Report** report.
You will be asked to confirm.
Click .
{% endstep %}
{% endstepper %}
***
## Common Discrepancies (Gotchas) - Why Reports Don’t Always Match
Reports can show different totals because some data may be missing or unassigned.
Examples:
* **Sales > By Product** – Does not include unassigned product lines (often from imports or the PO AI Inbox).
* **Sales > By Customer** – Does not include orders not linked to a customer.
* **Sales > By Delivery Date** – Does not include orders without a delivery date.
* Reports filtered by **Department, Customer, Category, Group, Delivery Date, or Sales Rep** – If something isn’t assigned, it won’t appear in the report.
If data is missing, totals won’t match.
***
#### Margin Reports & Cost of Goods (COGS)
Margin reports only work if products have Cost of Goods (COGS).
* COGS comes from batch information in Inventory.
* COGS is recorded when the full process is used, including Expenses.
* If COGS is zero, Net Sales in margin reports will also be zero.
* To get accurate margin reports, both **Inventory and Expenses** must be used.
This affects:
* **Margins > By (any option)**
* **Sales by Channel vs Margin by Channel** (Net Sales may not match if COGS is missing)
***
#### Gross vs Net Sales
If tax (such as GST) is applied to all products:
* **Gross Sales – Net Sales = Tax**
The difference should match the Tax column.
***
#### Warehouse vs Product Reports
* **Sales > By Warehouse** includes the full sale (products, shipping, fees, credits).
* **Sales > By Product** only includes product line items.
The Product report does not include shipping, fees, or credits - which is why totals can differ.
***
#### In Short
Most differences happen because of:
* Missing or unassigned data
* Missing delivery dates
* Missing COGS
* Comparing full-sale reports with line-item reports
***
{% hint style="info" %}
### Points to Note
#### 1. How Totals are Calculated (The "Sum of Lines")
Supply'd uses a Bottom-Up calculation method for reports like *Sales > By Product*.
* **The Method:** It calculates the total for each individual line item (including rounding) first, then adds those totals together for the grand total.
* **The Benefit:** This ensures line-level accuracy, especially when different products have different tax rates or discounts.
* **The Discrepancy:** You may notice a $0.01 difference compared to a "Top-Down" calculation (calculating tax on the final subtotal) due to when rounding occurs.
#### 2. Sales Reporting: Gross vs. Net
Understanding the difference between these two figures is essential for accurate revenue tracking.
* **Gross Sales:** Total "sticker price" including taxes (such as GST) and before discounts. Best for tracking raw sales volume.
* **Net Sales:** Final revenue excluding taxes and after discounts/returns. This is the actual revenue reported on your profit and loss.
#### 3. Profitability: Gross vs. Net Profit
* **Gross Profit:** Revenue minus COGS (Cost of Goods Sold). It tells you if a specific product is priced correctly (e.g., Bread Price - Ingredient Cost).
* **Net Profit:** The final amount left after subtracting everything—including labor, rent, power, and your Supply’d subscription.
#### 4. Understanding COGS (Cost of Goods Sold)
Supply'd provides a real-time "Operational" view of your costs rather than just a month-end accounting summary.
* **Landed Costs:** Includes the product price plus freight, shipping, and supplier fees.
* **Yield & Wastage:** Automatically factors in the cost of wasted ingredients (e.g., flour bought vs. flour used) into your COGS.
* **Batch-Level Costing:** Uses FIFO (First-In, First-Out) to track price fluctuations. If the price of a supplier's milk rises, Supply'd knows exactly which batch you are currently using to keep profit reporting 100% accurate.
{% endhint %}
***
## Searching a Report
You can search a report for any specific search term. For example, you want to see the statistics for a certain product, you would search for the name of the product and the report will show statistics for that product.
To search in a report, click on the magnifying glass and enter your search term. In this case searching "Caramel" will bring up all products with caramel in the name, within that report.
Clicking the **X** in the search box will reset the report to show all products again.
***
## Downloading a Report
To download a report, click on the 3 dots in the top right and select **Export Data**.

The report will download in a CSV format (can be opened in Excel, Numbers etc.).

***
## Filtering a Report
Reports can be filtered to show data from only those areas you wish to see.
To filter a report click on the 3 lines in the top right.

The **Filter Report** form will appear. Select the details you would like to filter the report with.
{% hint style="info" %}
The options will vary depending on the report selections.
{% endhint %}
Click the button to apply your selections and filter your report.
---
# Agent Instructions: Querying This Documentation
If you need additional information that is not directly available in this page, you can query the documentation dynamically by asking a question.
Perform an HTTP GET request on the current page URL with the `ask` query parameter:
```
GET https://help.supplyd.co/reports/running-and-viewing-a-report.md?ask=
```
The question should be specific, self-contained, and written in natural language.
The response will contain a direct answer to the question and relevant excerpts and sources from the documentation.
Use this mechanism when the answer is not explicitly present in the current page, you need clarification or additional context, or you want to retrieve related documentation sections.